Zhe Chen

Blog for Front End Technologies


  • Home

  • Categories

  • Tags

  • Archives

设计和编写front end component

Posted on 2017-05-17 | In Front end , 前端

本文的结构和理念参考自:http://web.jobbole.com/87164/

文章的初衷

现在的工作中往往依赖React.js,Backbone.js等等这样的framework来编写component,却对framework内部的逻辑知之甚少。于是在脱离开framework时,几乎难以仅仅使用vanilla JavaScript,HTML和CSS来单独进行开发。

这篇文章的目的是总结归纳,在不依赖framework时开发component的几个基本的步骤,使自己未来的工作更高效,并且更少地依赖于framework的逻辑,使得自己代码的复用率显著提高,相同地,也促进对framework原理和逻辑的理解。

为什么要开发component

原因非常简单:

  1. 提高code maintainability
  2. 提高code reusability

核心思想:DRY (don’t repeat your self)

具体实现

requirement

假定我们要实现Facebook news feed card的设计:
news feed card

breakdown

  1. Model:存储需要render这个news feed card的data(如发布者,标题,图片链接)以及储存一些前端使用的状态data(例如是否有点赞,是否播放当前视频)
  2. View:ui,可视部分
  3. Controller:逻辑处理,例如如何request评论data,如何send request

方法和步骤

Model

Model是储存数据的地方,可以在这里做ajax call,也可以在controller内进行,取决于你的需求。

1
2
3
4
5
6
7
const getNewsFeedModel = function() {
return {
title: 'news feed title',
description: 'news feed description',
imgSrc: 'http://placehold.it/350x150',
};
}

View

View的核心是构建一个供component使用的template,这个template可以预先放置于HTML DOM tree中,也可以直接将其写于template function中。

第一个方法:使用<template> tag
See https://developer.mozilla.org/en-US/docs/Web/HTML/Element/template

1
2
3
4
5
6
7
8
9
10
11
<template id="news-feed">
<div class="news-feed">
<div class="news-img">
<img src="">
</div>
<article class="news-details">
<h2></h2>
<p></p>
</article>
</div>
</template>

<template> 不同browser的支持状况不同,推荐使用前检查Can I use上的browser支持状况。

这里有一个小的变种,使用<script type="text/template"> tag(Backbone在构建Backbone view的template时也使用这样的方法)。

因浏览器不能识别text/template这个MIME type,因此browser会忽略parse这个tag。借助这个特性,我们可以把template放入<script>tag内,供我们的javascript代码读取。代码示例如下:

1
2
3
4
5
6
7
8
9
10
11
<script type="text/template" id="news-feed">
<div class="news-feed">
<div class="news-img">
<img src="">
</div>
<article class="news-details">
<h2></h2>
<p></p>
</article>
</div>
</script>

在使用<template>tag时,我们只需要选择#news-feed,inject data,并生成和返回一份DOM Node Copy。

1
2
3
4
5
6
7
8
9
10
11
12
13
const getNewsFeedView = function(model) {
const template = document.querySelector('#news-feed');
const title = template.content.querySelector('h2');
const description = template.content.querySelector('p');
const img = template.content.querySelector('img');
title.text = model.title;
description.text = model.description;
img.src = model.imgSrc;
// see https://developer.mozilla.org/en-US/docs/Web/API/Document/importNode
return document.importNode(template.content, true);
}

第二个方法:直接在view-generating function内写入template string

1
2
3
4
5
6
7
8
9
10
11
12
13
14
15
16
17
18
19
const getNewsFeedView = function(model) {
const template = [
'<div class="news-feed">',
'<div class="news-img">'
`<img src="${model.imgSrc}">`
'</div>',
'<article class="news-details">',
'<h2>',
model.title,
'</h2>'
'<p>',
model.description
'</p>',
'</article>',
'</div>'
].join('');
return
}

这种方法的缺点是代码的可维护性比较差,如果需要修改html markup,需要进行大量的修改,且不够直观。因此,更推荐使用第一种方法。

Controller

这部分的功能是在各个不同的event和state下,调用View的方法。例如click button to load more news feed。在这里可以attach各个DOM event。

尾声

经过本文的总结,我们可以发现,脱离开framework进行开发,其实很简单,也很强大。对我来说,最宝贵的一点是加深了对DOM的理解、以及如何高效和有效地剥离开各个部件,进行有效的代码利用。

阅读完本文后,不妨放下手中的framework,尝试用最简单的工具,从头构建一个component。相信你会受益匪浅。
用Flexbox实现整个页面的layout

Posted on 2017-05-15 | In Front end , 前端

最近面试了几家美帝大公司的front end职位。在这几次面试中,几乎每次面试的css题目中都有涉及到flexbox的layout。可以看出,flexbox在工业界的使用还是很广泛的。(我几乎没有被问到关于float的问题)

这篇文章会总结flexbox的常用技巧,以及适用场景。未来会添加grid system的信息和内容。

本文的实例参考自css grid vs flexbox

两个例子

用于整个页面的layout

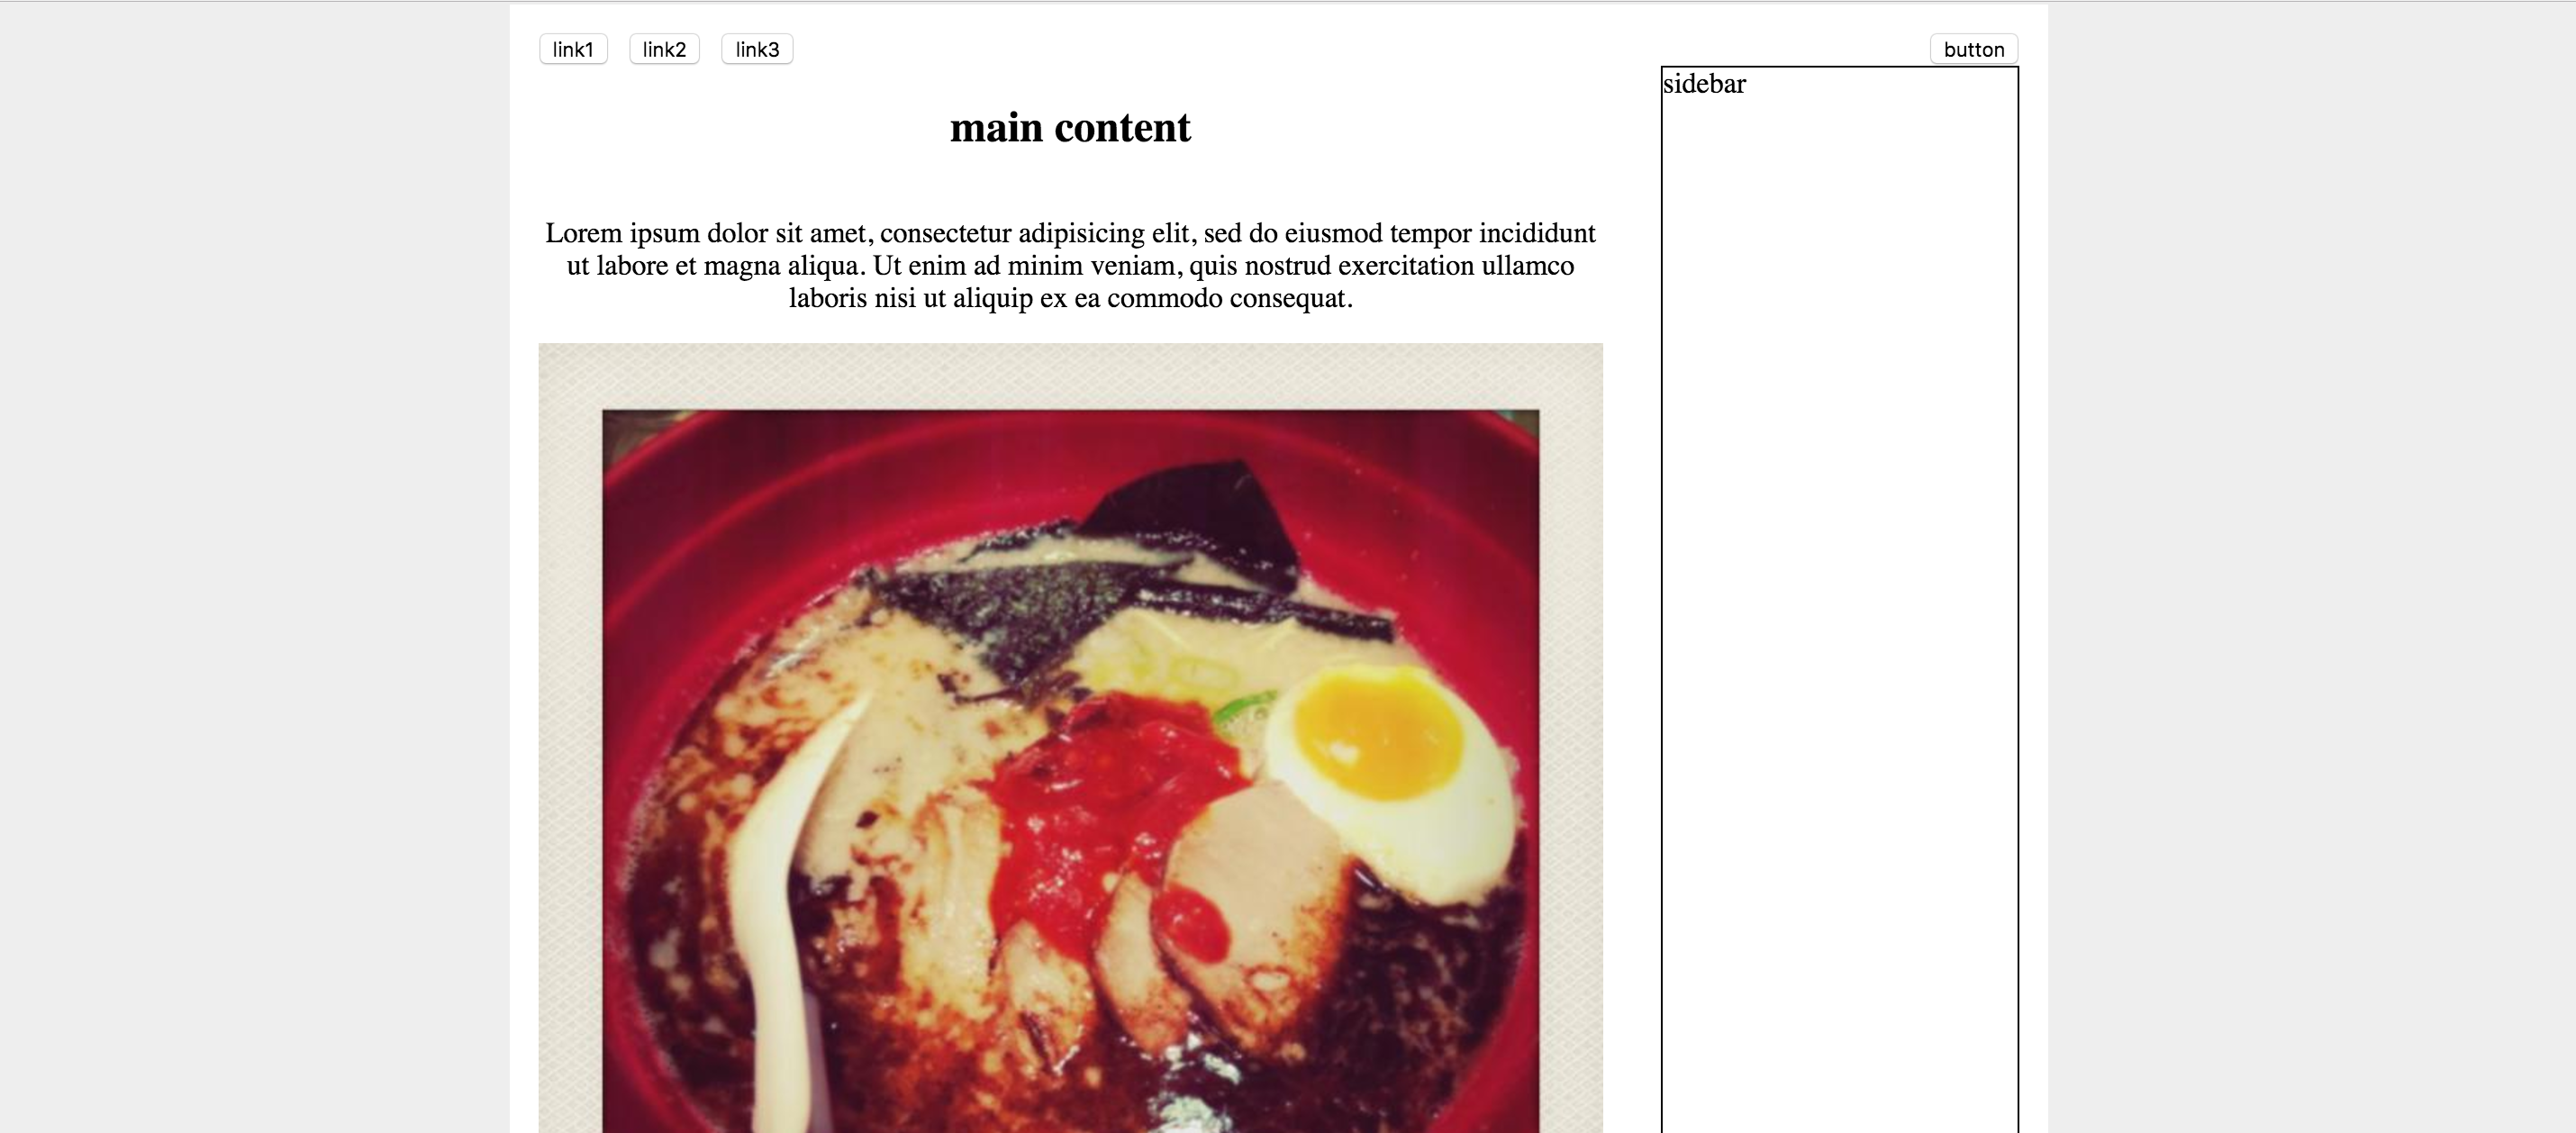
假设我们有如下的page design:

page layout

我们可以看到,page上有navbar,main content(分左右两栏),以及footer(未包含在截图中)。这样的layout下可以使用flexbox吗?

当然可以!通过以下几个步骤,即可实现一个简单的layout:

1
2
3
4
5
6
7
8
1. 把这几个component放入一个`div`中,
即flexbox的container部分,将其设置为`display: flex`。
2. 设置`flex-direction: column`。
这个property可以将flexbox的component放置的位置设置为列。
3. 设置`justify-content: space-between`。
这个property的值会告诉浏览器如何计算flexbox中element的间隔和位置。

用于某一个小的component的layout

在上例,我们应用flexbox实现一个页面的整体layout。

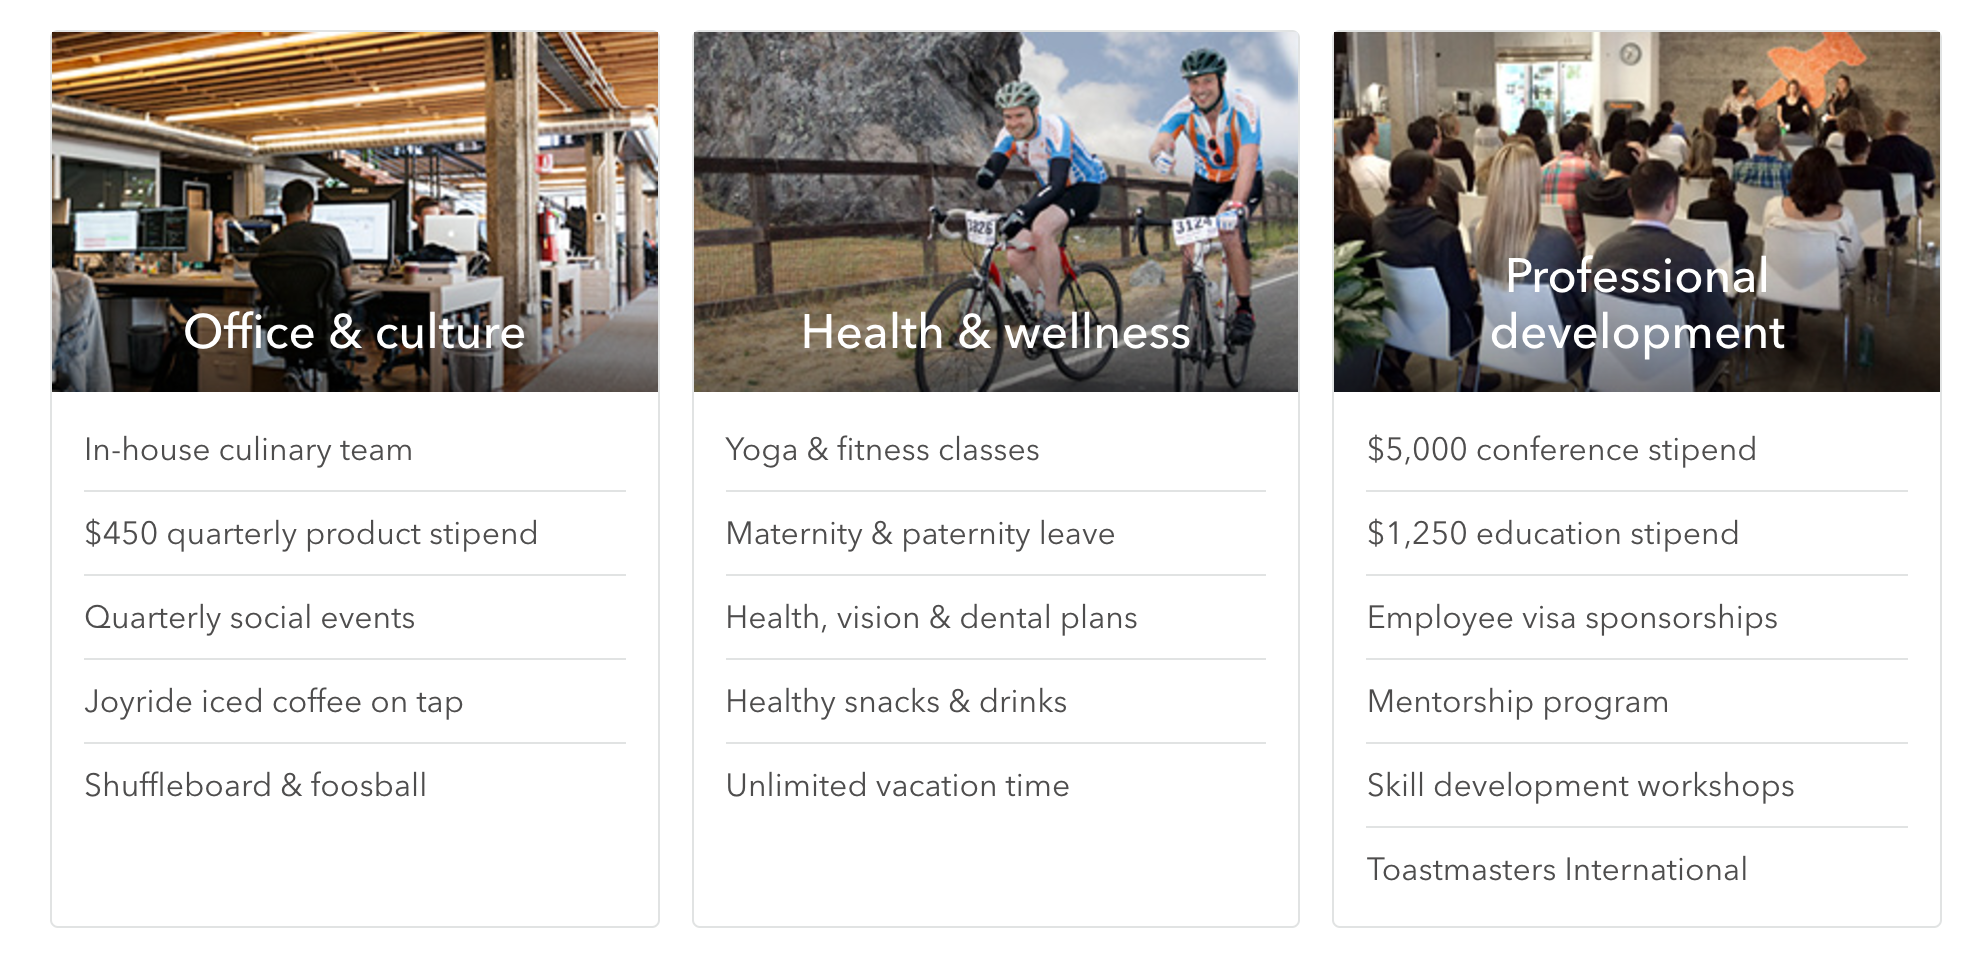
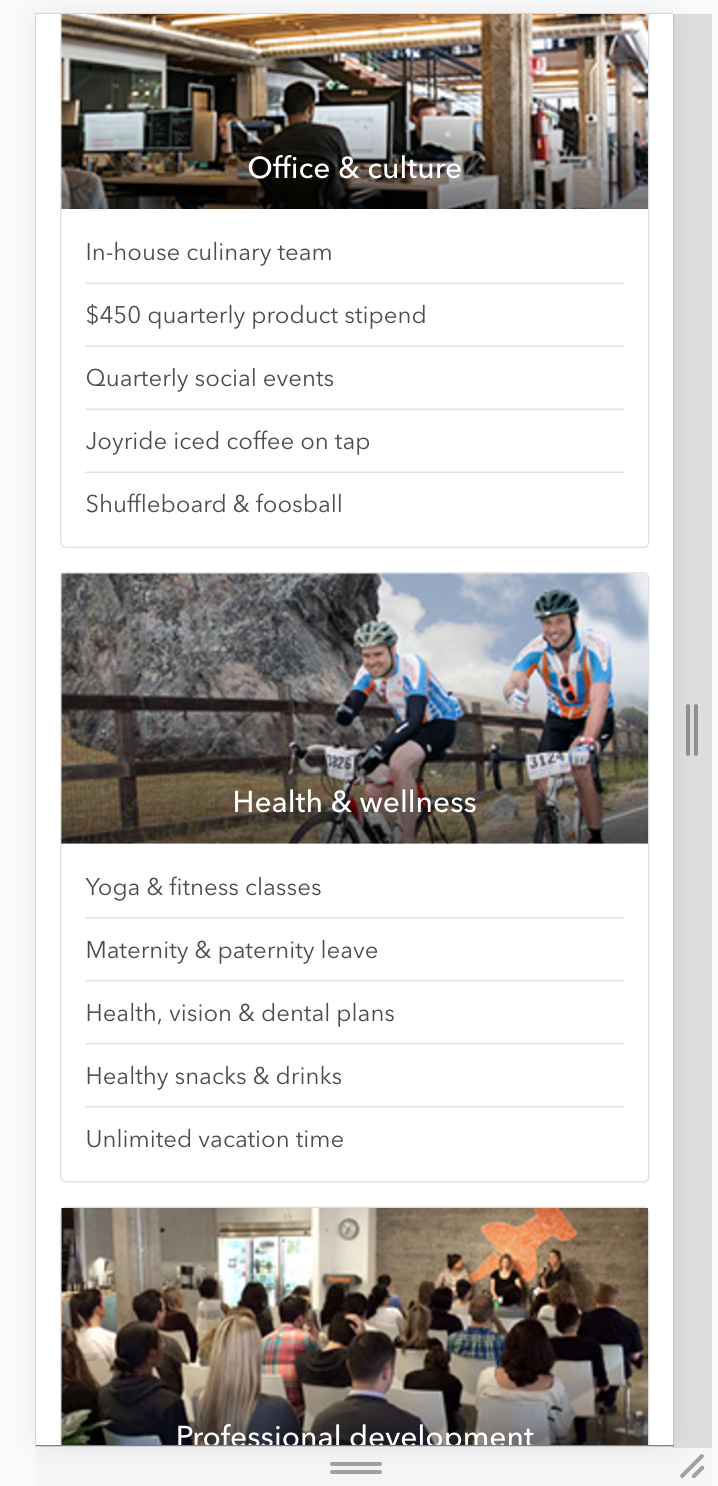
如果我们想做card container的layout,且使其支持responsive design,(design如下图,直接用了Thumbtack网站上的card design截图 🙃)

design - big screen design - small screen)

以上layout也可以使用flexbox,且非常简便。

具体的实现如下:

1
2
3
4
5
6
7
8
9
10
11
12
13
14
15
16
17
18
19
20
21
22
23
24
25
26
27
28
29
30
31
32
33
34
35
36
37
38
39
40
41
42
43
44
<div class="perks">
<div class="perks--body">
<div class="perks--groups">
<div class="perks--group">
<div class="perks--image" style="background-image: url(https://static6.thumbtackstatic.com/_assets/images/release/pages/jobs/submodules/perks/images/office-22209281.jpg);">
<h2>Office &amp; culture</h2>
</div>
<div class="perks--list">
<div class="perks--item">In-house culinary team</div>
<div class="perks--item">$450 quarterly product stipend</div>
<div class="perks--item">Rooftop deck with 360&deg; view</div>
<div class="perks--item">Quarterly social events</div>
<div class="perks--item">Joyride iced coffee on tap</div>
<div class="perks--item">Shuffleboard &amp; foosball</div>
</div>
</div>
<div class="perks--group">
<div class="perks--image" style="background-image: url(https://static7.thumbtackstatic.com/_assets/images/release/pages/jobs/submodules/perks/images/wellness-7fda7cd8.jpg);">
<h2>Health &amp; wellness</h2>
</div>
<div class="perks--list">
<div class="perks--item">Yoga &amp; fitness classes</div>
<div class="perks--item">Maternity &amp; paternity leave</div>
<div class="perks--item">Health, vision &amp; dental plans</div>
<div class="perks--item">Healthy snacks &amp; drinks</div>
<div class="perks--item">Unlimited vacation time</div>
</div>
</div>
<div class="perks--group">
<div class="perks--image" style="background-image: url(https://static6.thumbtackstatic.com/_assets/images/release/pages/jobs/submodules/perks/images/presentation-ede318f4.jpg);">
<h2>Professional development</h2>
</div>
<div class="perks--list">
<div class="perks--item">$5,000 conference stipend</div>
<div class="perks--item">$1,250 education stipend</div>
<div class="perks--item">Employee visa sponsorship</div>
<div class="perks--item">Mentorship program</div>
<div class="perks--item">Skill development workshops</div>
<div class="perks--item">Toastsmasters International</div>
</div>
</div>
</div>
</div>
</div>
1
2
3
4
5
6
7
8
9
10
11
12
13
14
15
16
17
18
19
20
21
22
23
24
25
26
27
28
29
30
31
32
33
34
35
36
37
38
39
40
41
42
43
44
45
46
47
48
49
50
51
52
53
54
55
56
57
58
59
60
61
62
63
64
65
66
67
68
69
70
71
72
73
74
75
76
77
78
79
80
81
82
83
84
85
86
// media query breakpoint
$mobile: "(max-width: 900px)";
$container-width: 900px;
$card-margin-right: 10px;
$card-margin-bottom: 8px;
$color-gray-light: rgb(232,234,234);
$color-gray-medium: rgb(121,120,120);
$color-white: rgb(255,255,255);
.perks {
max-width: $container-width;
font-family: sans-serif;
.perks--groups {
display: flex;
flex-wrap: wrap; // support responsive
.perks--group {
box-sizing: border-box;
flex: 1; //设置每个.perks--group的宽度相等
display: flex;
flex-direction: column;
border: 1px solid $color-gray-light;
border-top-left-radius: 4px;
border-top-right-radius: 4px;
&:not(:last-child) {
margin-right: $card-margin-right;
}
.perks--image {
display: block;
height: 180px;
position: relative;
background-size: cover;
background-repeat: no-repeat;
h2 {
text-align: center;
position: absolute;
bottom: 0;
width: 100%;
color: $color-white;
font-weight: 400;
}
}
.perks--list {
padding: 12px 20px;
.perks--item {
padding: 12px 0;
color: $color-gray-medium;
&:not(:last-child) {
border-bottom: 1px solid $color-gray-light;
}
}
}
}
}
}
@media #{$mobile} {
.perks {
.perks--groups {
.perks--group {
width: 100%;
&:not(:last-child) {
margin-bottom: $card-margin-bottom;
}
&:not(:last-child) {
margin-right: 0;
}
}
}
}
}

在使用flexbox时有几个小技巧:

  1. 当需要设置一个box内的flex component的宽度比时,灵活使用flex。flex是flex-grow, flex-shrink和flex-basis的简略写法。
  2. align-items可以纵向对其
  3. flex-wrap可以强制所有element在一行,或是分成几行。同media-query一起灵活使用,可以实现responsive design

Codepen实例如下:

See the Pen ybjXZQ by Zhe Chen (@chenzhe142) on CodePen.

小结

flexbox非常简单易用,且可以实现非常棒的layout效果,对比float,减少了大量的css的使用,也使代码更易维护。唯一的缺点可以说是实现responsive design,运用media-query时还比较繁琐,需要一点一点地精确调整margin,padding或者其他property的值。

综上所述,flexbox非常强大,值得我们深入学习和应用。

参考链接:

  1. css-tricks - a guide to flexbox
  2. css grid vs flexbox

Tricks to minimize React.js build file size

Posted on 2016-10-10 | In Front end , 前端

When using React.js in my personal projects, I found out that when the project grows bigger and bigger, the final build file gets bigger and bigger as well.

The build JavaScript file easily goes above 1MB, even though I only have less than 10 React components.

React generated build size

With this huge file size, the page spends 4 seconds to download JavaScript and CSS files, and total 7 seconds for initial page rendering.
This is definitely not good.

Not good for page performance, neither for user experience.

So, how can I minimize the file size?

I spent some time looking around all possible solutions, and here are some efficient tricks that can solve the problem.

Tricks

minify front end code

This is the most commonly used method when we want to minimize front end file size. If using Webpack as React.js build tool, we can use webpack.optimize.UglifyJsPlugin to minify front-end needed files.

create production env variable in Webpack config

1
2
3
4
5
new webpack.DefinePlugin({
'process.env': {
'NODE_ENV': JSON.stringify('production')
}
})

tree shake

According to current stable version (1.13.2), Webpack does not support ES6 tree shaking. But there is one little trick we can use:
When setting up babel config, use the following preset:

1
2
3
4
5
6
7
8
9
10
11
"babel": {
"presets": [
"react",
[
"es2015",
{
"modules": false
}
]
]
}

With Webpack 1.13.2, tree-shaking works like magic. :)

Before vs. After

Use my personal project as an example. I have 10 React components (most of them are having long definitions and more than 5 functions). CSS is not included in the final bundle.js build file.

Here is result:

  • original file size(with no optimization): 1.35MB
  • with tree-shaking: 576kB (-58.3%)
  • with tree-shaking + Production env variable: 544 kB (-60.6%)
  • plus minify: ~10% of previous step’s file size (544 kB)

If using these 3 tricks together, the final size of bundle.js would be ~500kB, only 36.2% of its original size.

These 3 tricks are definitely powerful, and easy to use!

Future: Webpack 2.0

I am excited to see Webpack 2 support ES6 tree shaking, and simpler way setting up Node.js production flag in Webpack config.

Currently Webpack is beta-testing v2.1 version. I am trying out different new features. It’s awesome to see Webpack is getting better and better!

What’s your trick?

I would like to know what’s your trick when optimizing React.js performance. Leave a comment and let’s discuss!

React native project setup — a better folder structure

Posted on 2016-09-15 | In Front end , 前端

Currently, I am building a small notebook app with React-native. While the framework has so much fun to play with, and make my life much better and easier to build cross-platform projects, it does give me some pain, especially when the project grows bigger and bigger.

My project folder got messy when I started creating new scenes, and global styles. At the very beginning of the development, I kept all style files inside of its React Component class definition file, declaring all styles (font size, color, background color, container flexbox, etc.).

But as soon as the scenes and components of the app gets more and more complicated (and some of the components were very similar, only have slightly differences, like font size, functions), I realized that I wrote too much duplicated code, copying and pasting them all over the project!

OK, it’s time to take some effort to clean up the folder , and refactor the code. Keep it DRY.

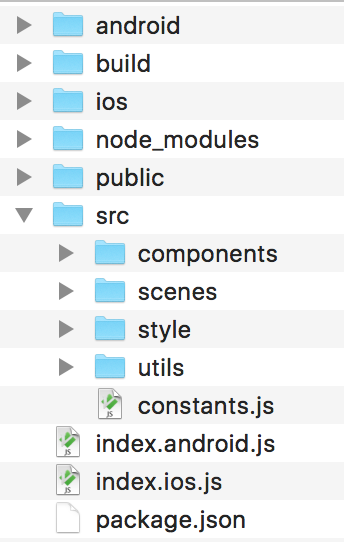
Here is the structure I’m using for my React-native project:

folder structure
1
2
3
4
5
6
7
8
9
10
11
12
/android: Android native code
/build: stores iOS apk and Android app installation packages
/ios: iOS native code
/public: stores images, audios and other assets
/src: JavaScript source files
constants.js: I put all constant variables into this file
/components: React-native components, such buttons, lists
/scenes
/style: shared style files, text, colors, etc.
/utils: reusable functions
index.android.js: Android entry file
index.ios.js: iOS entry file

Here are 3 steps that I followed to re-organize the folder:

1. Move all components into a separate folder

folder structure 2

2. Put style code into a separate file

folder structure 3

My app uses 4 different styles of text, title, subtitle, paragraphs, data. It would be much more easier to just import the style of text, and use it directly.
I put shared text styles in to text.js file:

1
2
3
4
5
6
7
8
9
10
11
12
13
14
15
16
17
18
19
20
21
22
23
24
25
26
const text = StyleSheet.create({
p: {
color: 'black',
fontFamily: 'Open Sans',
fontSize: 14,
},
title: {
fontWeight: 'bold',
color: 'black',
fontFamily: 'Open Sans',
fontSize: 20,
},
subTitle: {
fontWeight: 'bold',
color: 'black',
fontFamily: 'Open Sans',
fontSize: 14,
},
data: {
color: 'black',
fontFamily: 'Open Sans',
fontSize: 25,
},
});
export default text;

When defining React component, you can simply import this text style, and use it directly.

1
<Text style={text.p}>settings</Text>

Overriding the style is very easy, just like the way we do with CSS inline styles :)

1
<Text style={[text.p, {backgroundColor: 'red']}>settings</Text>

The idea of separating style code by fundamental components is inspired by Atomic Design. It believes small atoms build up big elements.

I think the idea is very similar to the concept of React-Native, focusing on building components. So I tried it out in this way, so far so good!

3. Move shared functions into a separate folder

folder structure 4

This idea is came from Airbnb’s open source library, react-dates. Originally, I was checking its source code, and get some ideas on my editor linting config. But soon I realized that the way Airbnb organizes source files was amazing and elegant.

This makes my code easy to maintain, but also much more easier to access in different components. If the code is much more easy to maintain than before, I am sure the development process would be more smooth, and so as my productivity.

Ending

This folder structure saves me so many efforts on modifying shared styles! Before organizing the folder into this way, I need to go to each component, find out the specific line for a specific style definition. But now, all I need to do is going straight to the style file, open it, and change it. That’s it!

Now, developing in React-native truly becomes one of the best tasks in my spare time, and I am more productive and organized.

Hope this article can give you some ideas and inspirations on gathering your project files.

Happy coding! 🎉

Zhe Chen

Zhe Chen

🇨🇳 software engineer in Seattle. Coding & writing with JavaScript, HTML, CSS and ❤️

4 posts
2 categories
7 tags
GitHub
© 2017 Zhe Chen